Rather than hog the Show Us Your Basses thread, I decided to chronicle my Squier on a new thread.
I guess I am a bit OCD; the crooked pot, the wavy pickguard, and… darn it, I want those classic P-Pass looking pickups instead of the rail pickups! So, I decided to invest in some parts for my Squier. I know there’s risk, but I’m going to chalk this up to a learning experience.
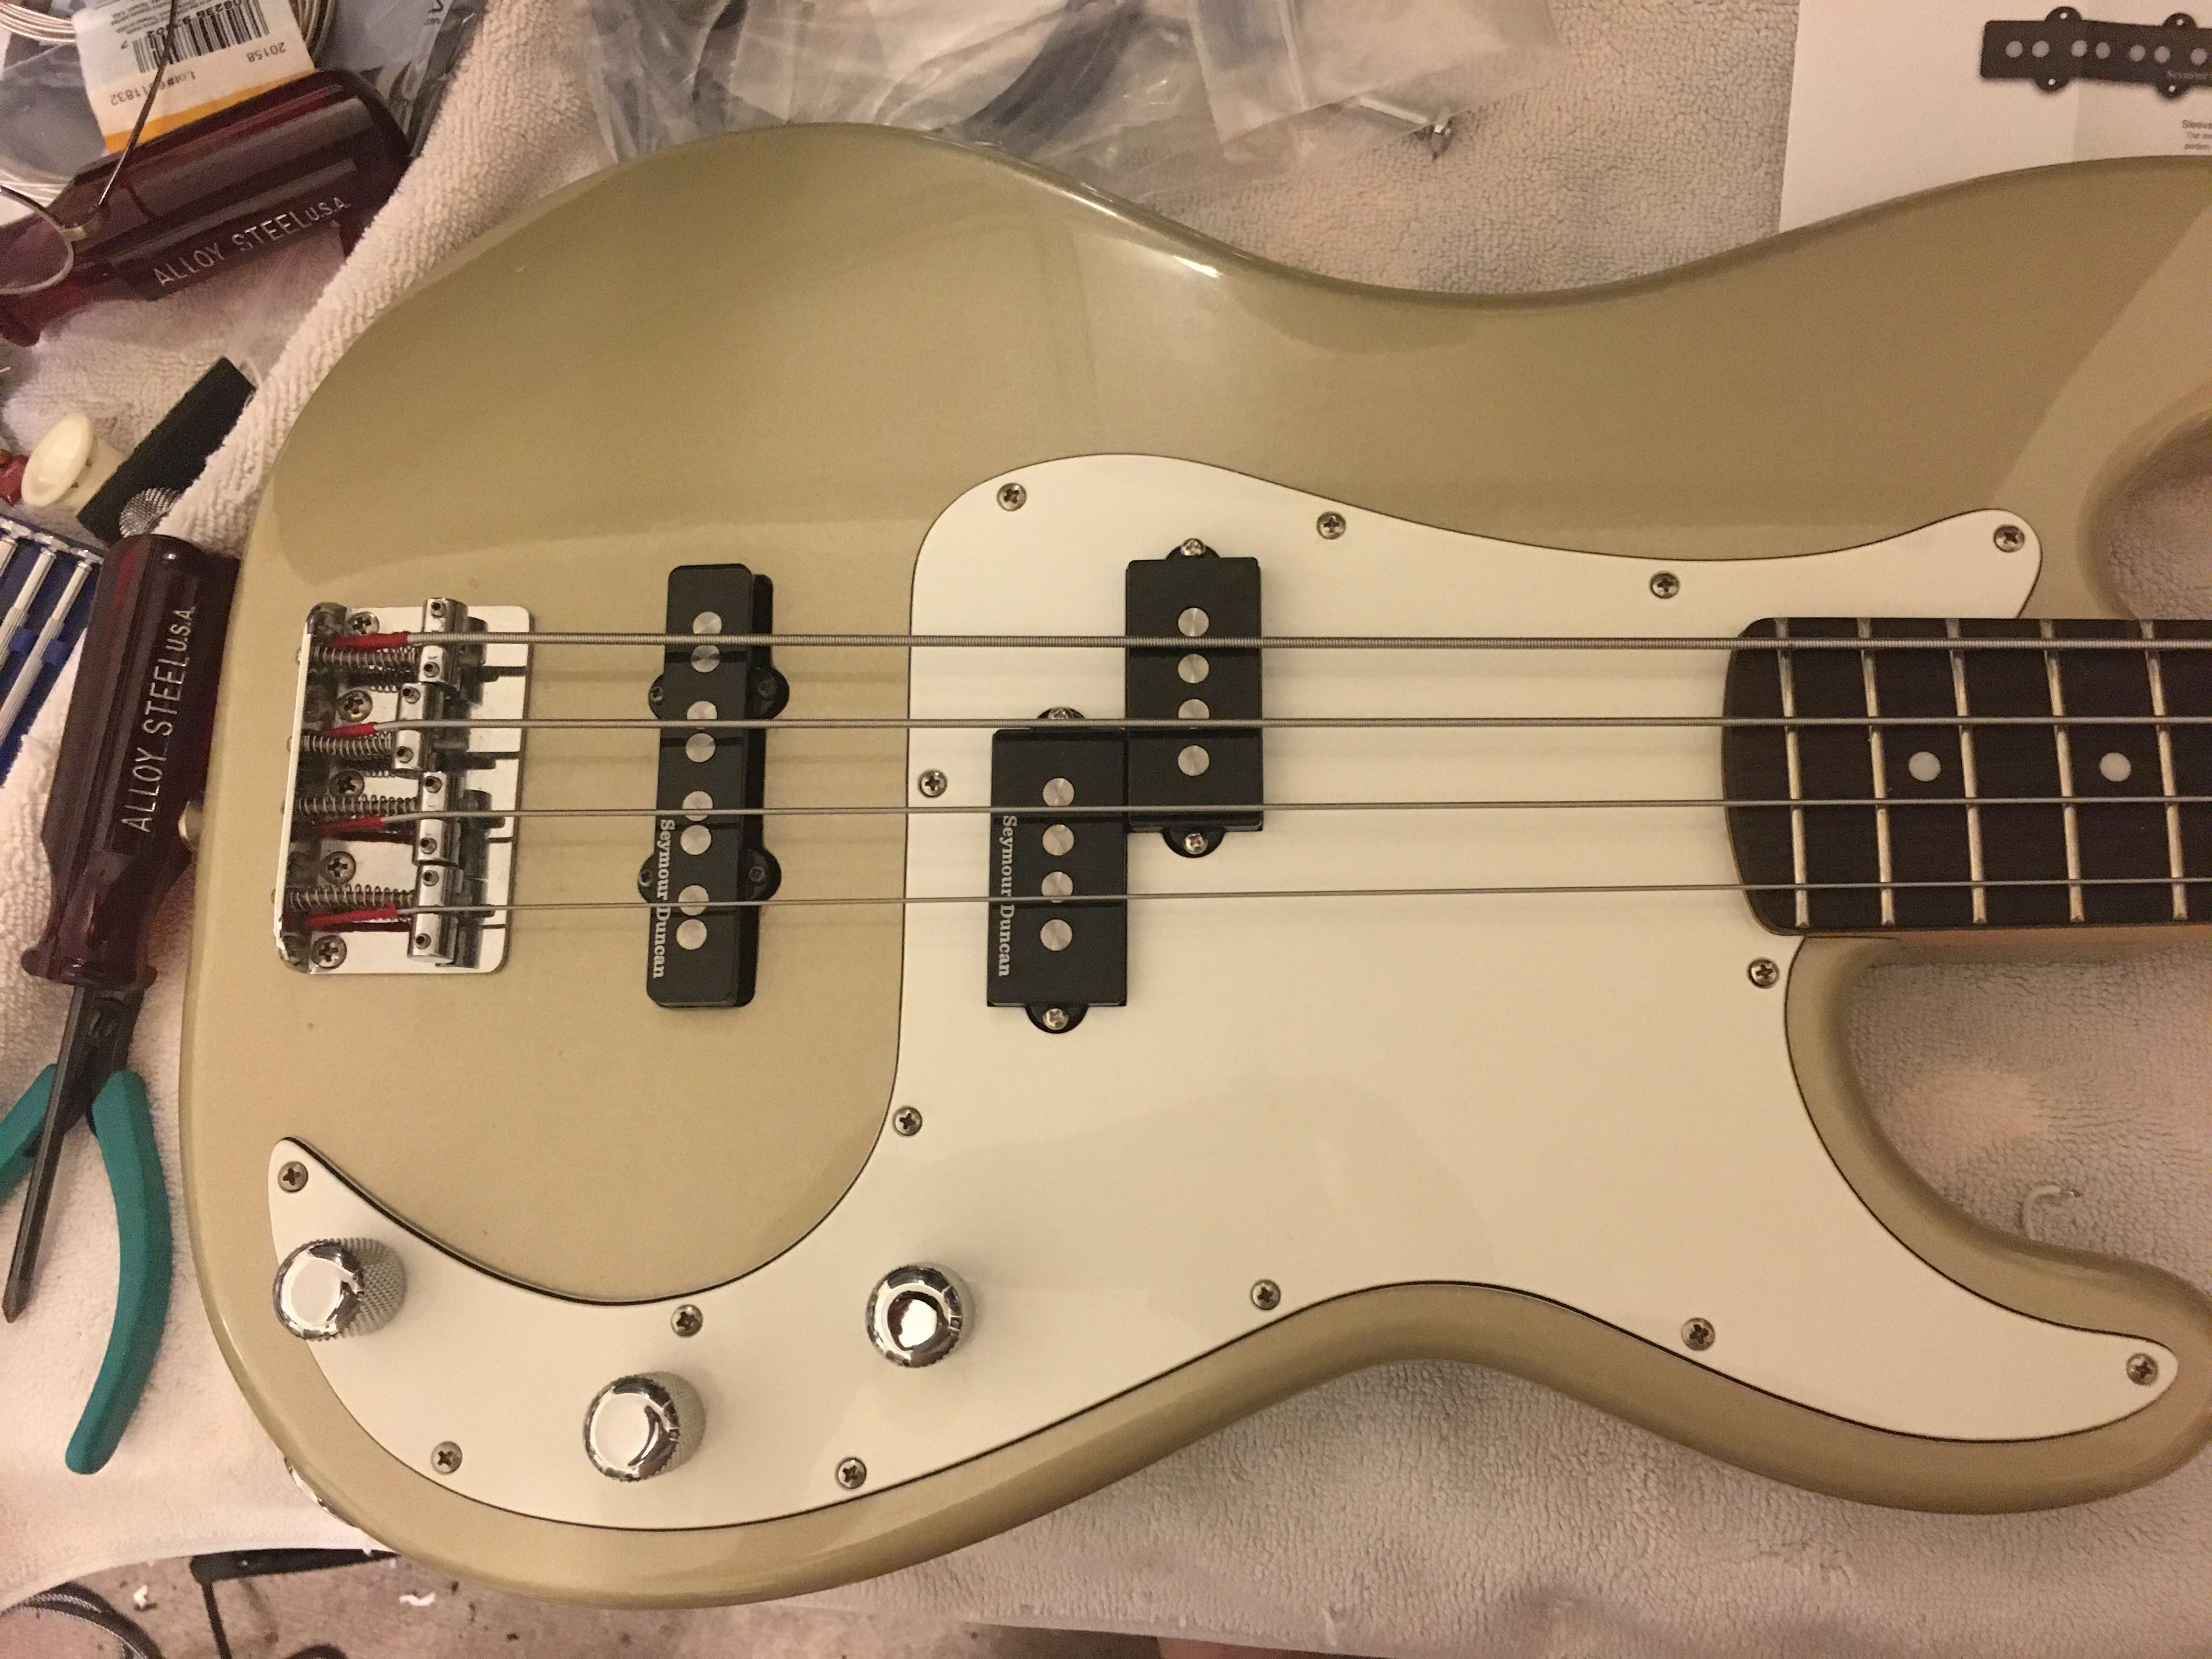
So, I decided to replaced the strat style knobs and pots with classic P-Bass knobs and solid shaft pots, and I bought a set of Seymour Duncan PJ pickups. This PJ has the signal jack in the butt of the body like a Telecaster, so I ordered a replacement jack to replace the stripped jack in my Squier.
I wondering what’s under the pickguard; I’m a little worried, but hopefully I it won’t be too bad (the done when the rail pickups were installed). At this stage I am way better mechanically than I am “BASSically.”
All the parts are in except for the pickups; they should be arriving tomorrow. The Telecaster jack looks like it will fit nicely, and chromed knurled knobs look / feel really nice.
I’ll post some pics of the tear down and re-assembly. I love the feel of this bass, and just can’t wait to get going.
Parts are in, and I took a part the Squier PJ. I was a little apprehensive because I new the bass had been modified.
Good news: I repaired the stripped out jack! The old jack bezel was aluminum and the threads had given way. So, when you jammed your patch cable into the bass, the jack pushed up into the guitar. I replaced the bezel and the jack with a Switchcraft jack and a bezel made of something a lot heaver than aluminum.
On to the pots. I replaced the neck pot, no problem. Beneath the pickguard the body looked fine, no mods, but unfortunately someone felt it necessary to enlarge the hole for the bridge pot. This is why the knob was canted. Not sure what to do about this, neither the new pot or the old one will sit straight in the enlarged hole. Any ideas on this? Maybe a couple of super slim washers, or maybe I can make a bushing of some sort. On the bright side, I love my new knobs!
The way I’m visualizing this is perhaps when they enlarged it, they didn’t make the hole “level”? Could you scrape out a little more of the wood at the bottom so the new knob sits level? Then you could add thin washers to build it up if needed.
So, the pickguard has a wallowed out / enlarged hole for the bridge pot. 14 hole squire pickguards are rare to find because they are old.
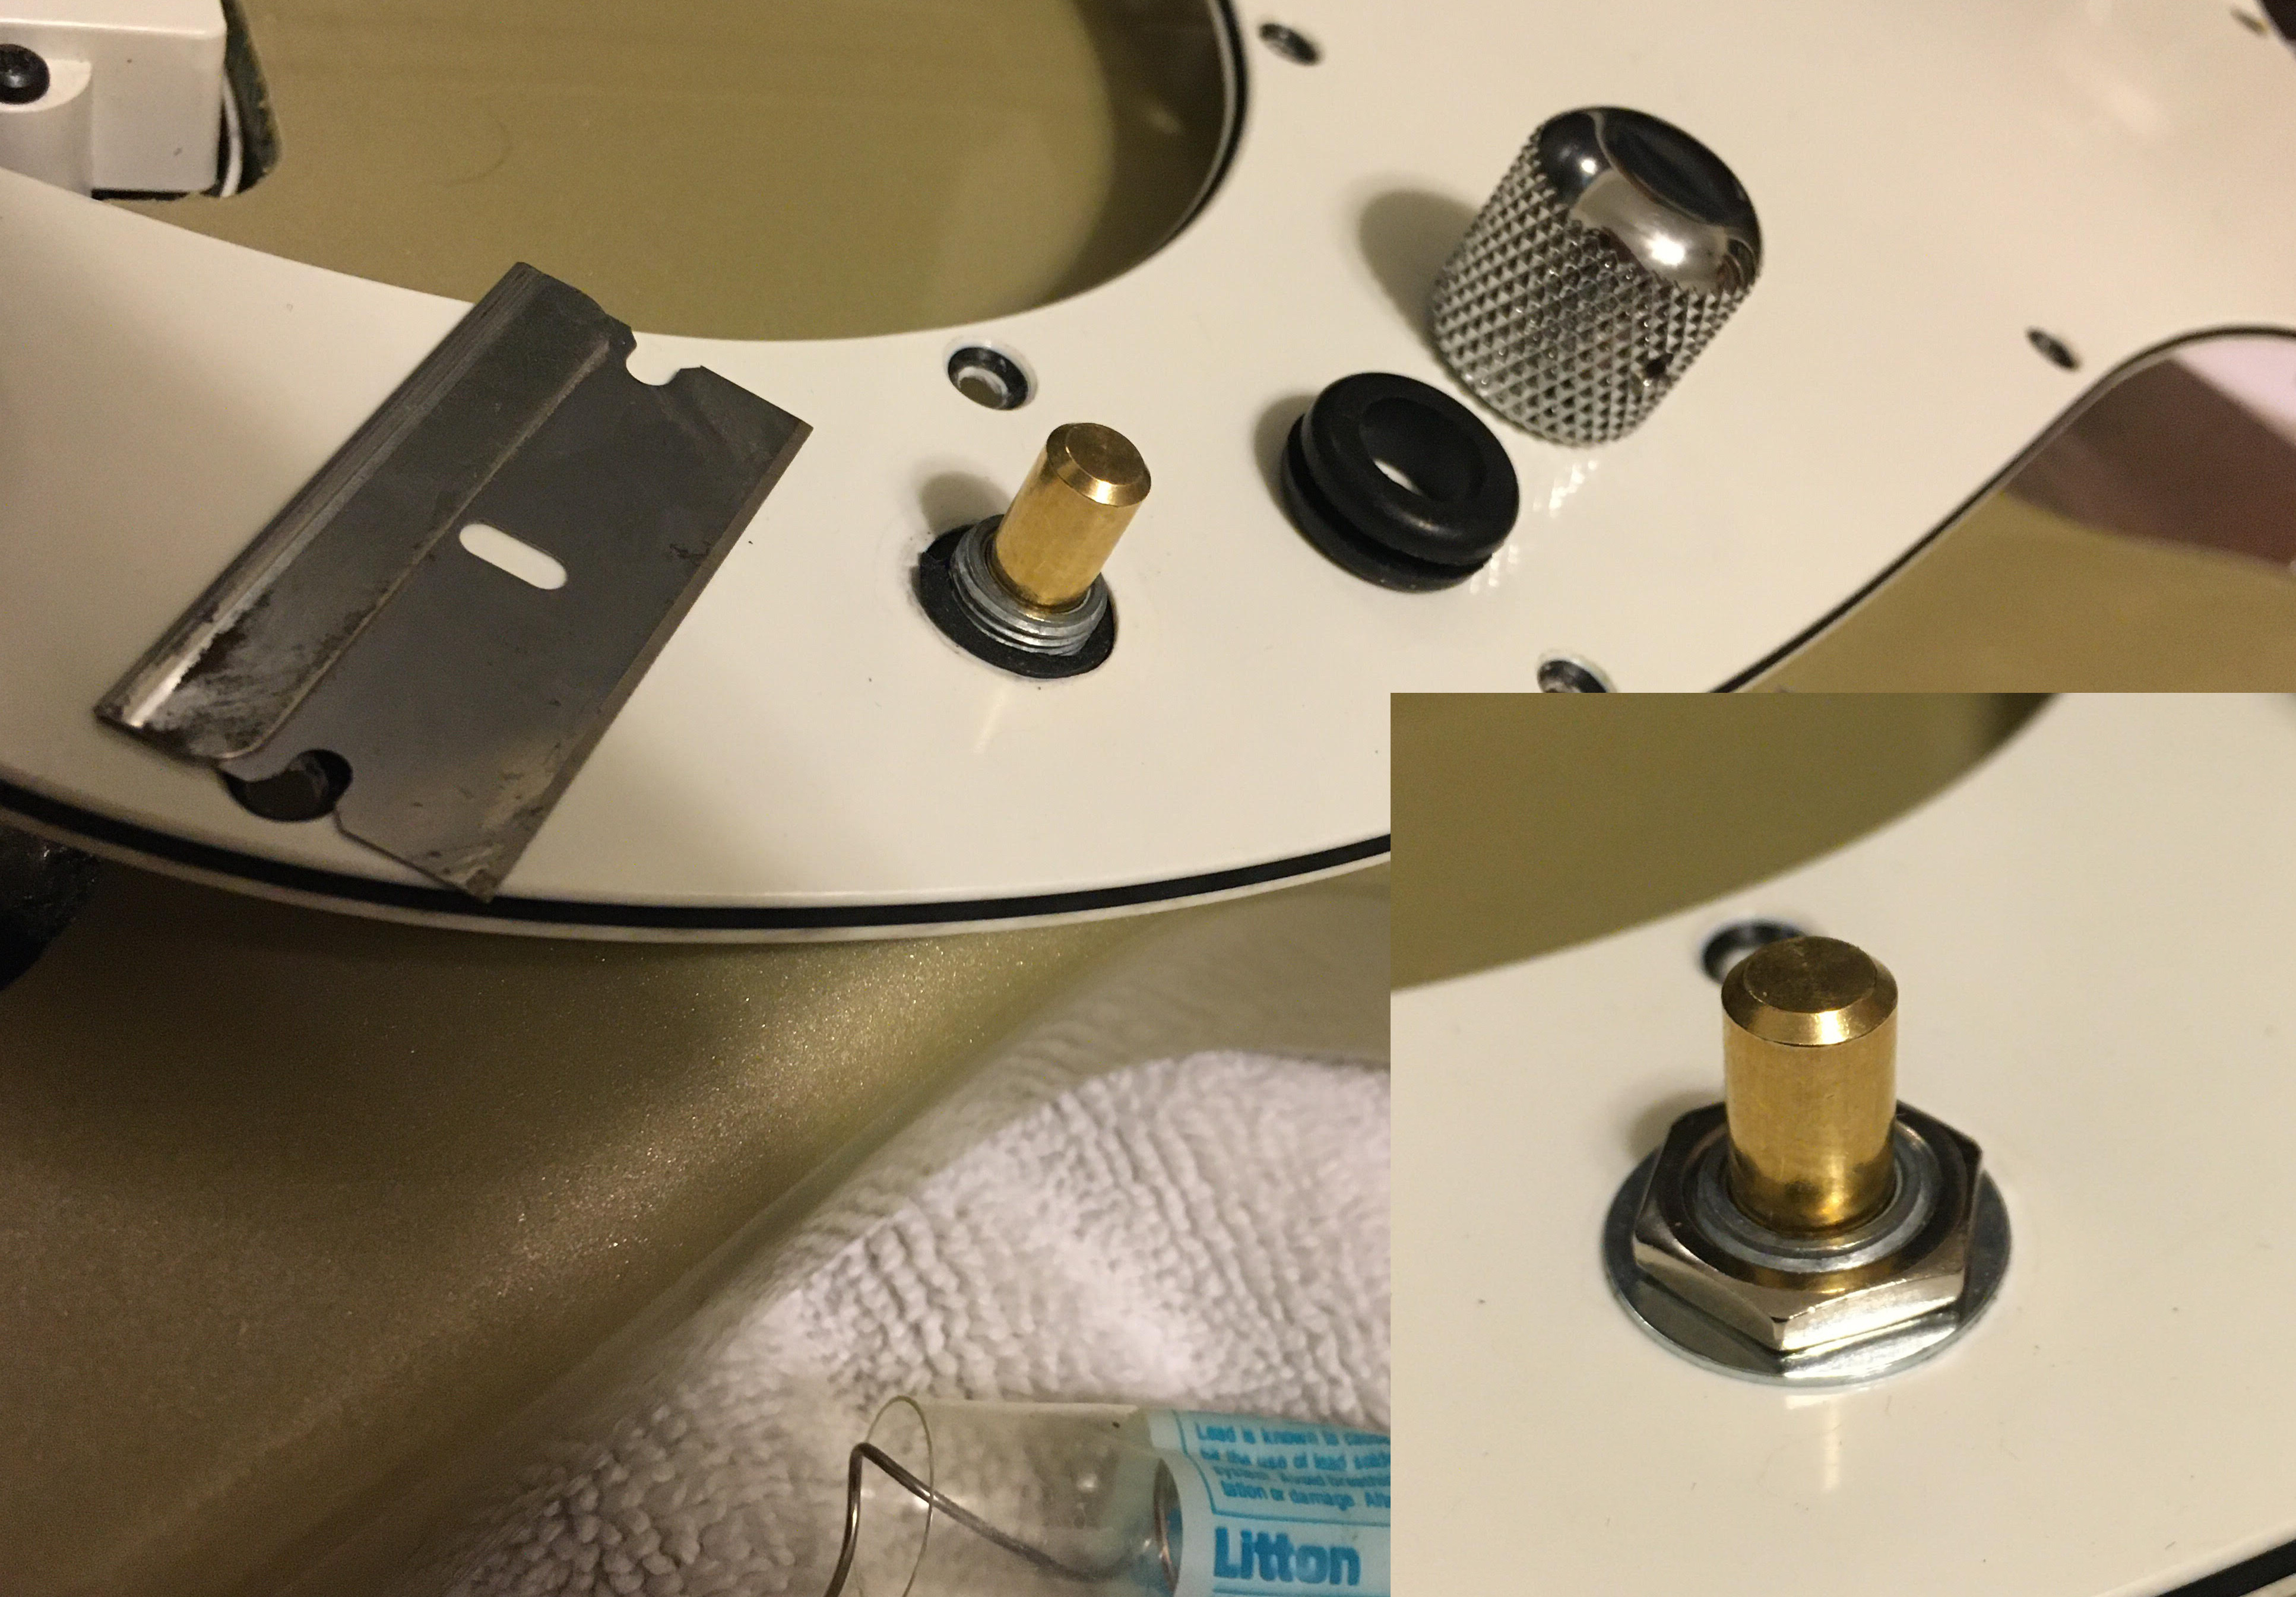
This what I ended up doing: I bought a 5/16" ID rubber grommet; sliced off the ends leaving the center. The OD of the center fits in the wallowed out hole to serve a packing to center the pot. Then I found some really thin flat washers (Allpart #EP-4970-000) at Guitar Center. put one washer on the pot, slipped it under the pickguard, then pressed in my grommet, then put the other thin washer on top. In this way the pot is centered, and gommet is a little thicker than the pickguard. So, I had a nice compressible sandwich, upon which I tightened the nut over. Viola! Centered, and the shaft is perfectly perpendicular to the pickguard. Ready to go! On to the pickups!
about the pot and the hole in the pickguard : there are two different diameters depending on the pots you have. the american pots are a bit bigger than the japanese pots. I guess that at some point, one of your pots has been changed and your pickguard has been drilled to match the diameter. it’s a relatively common issue (and not a big issue at all).
Generally I would agree, but in this case the hole was larger than than even American pots I installed. If it were a tad larger, my washers wouldn’t have covered it. It was about 3/8". The American Fender pots I installed were only 5/16" (same as the old one’s I pulled out). My guess is maybe whomever enlarged the holes originally may have made a mistake on that hole (first hole?).
The other thing that was curious was that the old pots I pulled out were all 500k, and the stock Fender’s I installed were 250k. Any ideas what difference this makes in the tone?
yeah, 250k will sound darker and 500k will sound brighter. with a P/J configuration, it’s more logical to use 500k pots because the two pots are wired in parallel (somewhat) so the equivalent resistance would be 500/2 = 250k. with 250k pots, the equivalent resistance would be pretty low. too low in my opinion.
I would recommend 500k linear pots for the volume pots and 250k log for the tone pot.
Thanks for the explanation @terb ! You’re explanation makes sense, and that sounds like something I want; I’m looking for warm rounded tones from this bass. Since the pots are in, I’ll probably finish the assembly and see what I’m getting and go from there.
I was ready to install the pickups, and then found myself in a conundrum with the directions. One of the p-bass pickups is clearly marked “Neck,” but the diagram shows the neck pickup with a white wire and a black wire. The pickup that’s labeled neck has two black wires, and the other one has the white and black wires. So, something is reversed (the drawing or pickup label). Do these ohm out differently? I’m going to try to contact Seymour Duncan, and see if I can find a clue!
Well, I put it together; I just slapped the old strings back on it with no tuning. The good news is both pickups work, controls work. But,…I had fun cramming the pickguard guts back in it, and apparently there’s interference with the jack and the tone control, so the patch cord doesn’t go all the way in.
I’ve got to take it a part again to see what’s up inside. Sure looks good though! Can’t wait to start playing.
Yeah, I was really expecting a problem with soldering, but it got better as I went. I was way out of practice, and of course you have to be patient with the iron (letting it get hot enough to flow solder effectively).
I’ll tear into it again this weekend. B2BA starts next week, so it needs to be ready!
Thanks! I was really looking hard at a new MIM P-bass or maybe a new PJ (G&L), but I just couldn’t figure out what kind sound I wanted. Then I read some comments here suggesting I buy a used bass, and then I took a step back and looked at Craig’s List and found this Squier.
$200 for the bass and about $175 in parts. A new MIM P-bass would run me nearly $700. I could probably be ahead with a new Squier, but I really enjoyed tearing this down and making it mine. I think I’d be afraid to tear into a new $700 bass.
I think you’re really going to like your Squier, @kwt7667 . . . especially after you’ve fixed it up so nicely!
I have owned both American J and P basses in years gone by, and can assure you I wouldn’t be able to tell the difference between them and my Squier (blindfolded of course lol). The neck alone is what impresses me most.
Well, it’s done now! It looks real nice with the traditional P-pass pickups installed. I found the problem with the signal jack. It was turned the wrong way and was interfering with the tone pot. I unscrewed the jack bezel, and rotated it 180 degrees; problem solved.
I splurged and put on a set of D’Addario strings. It occurred to me that I didn’t know how to cut the strings to the correct length after I discovered that the E string had a LOT of string on the tuner post. So, I eye balled A, D and G the best I could. I don’t have a tuner yet, so I used the Fender Tuner app on my iPhone. Then I checked intonation and it seems to be off – but I’m not sure. I think I really need to get a good tuner so I can know for sure. I haven’t set the pickup height yet on it or the saddle heights. I want to get a good tuner first. It would be good to upgrade the bass amp from the 6" unit I’ve got too.
Looks sweet! Im considering doing the same to my Ibanez Mikro. I love the way the neck feels, and the sound is decent. Would love to replace Bridge, Pots, PUs, and tuning machines… but at that point the stuff I put in it will be probably 2X the price of the whole Bass. But my thoughts are if the body and neck are good…why not!
And for the same reasons you gave about being afraid to tear into a $700 guitar… also why not just do it!
If I were you I would take that Squire in to a good music store and have them do a good setup and intonation. Mine charges $50 + strings if you want new strings.
Thank you! Love the tone of the new pickups. I’m not at all intimidated by the setup process – I just need a bit more knowledge (and a proper tuner!). Failing that, the Guitar Center is 4 miles from the house!


 This is why the knob was canted. Not sure what to do about this, neither the new pot or the old one will sit straight in the enlarged hole. Any ideas on this? Maybe a couple of super slim washers, or maybe I can make a bushing of some sort. On the bright side, I love my new knobs!
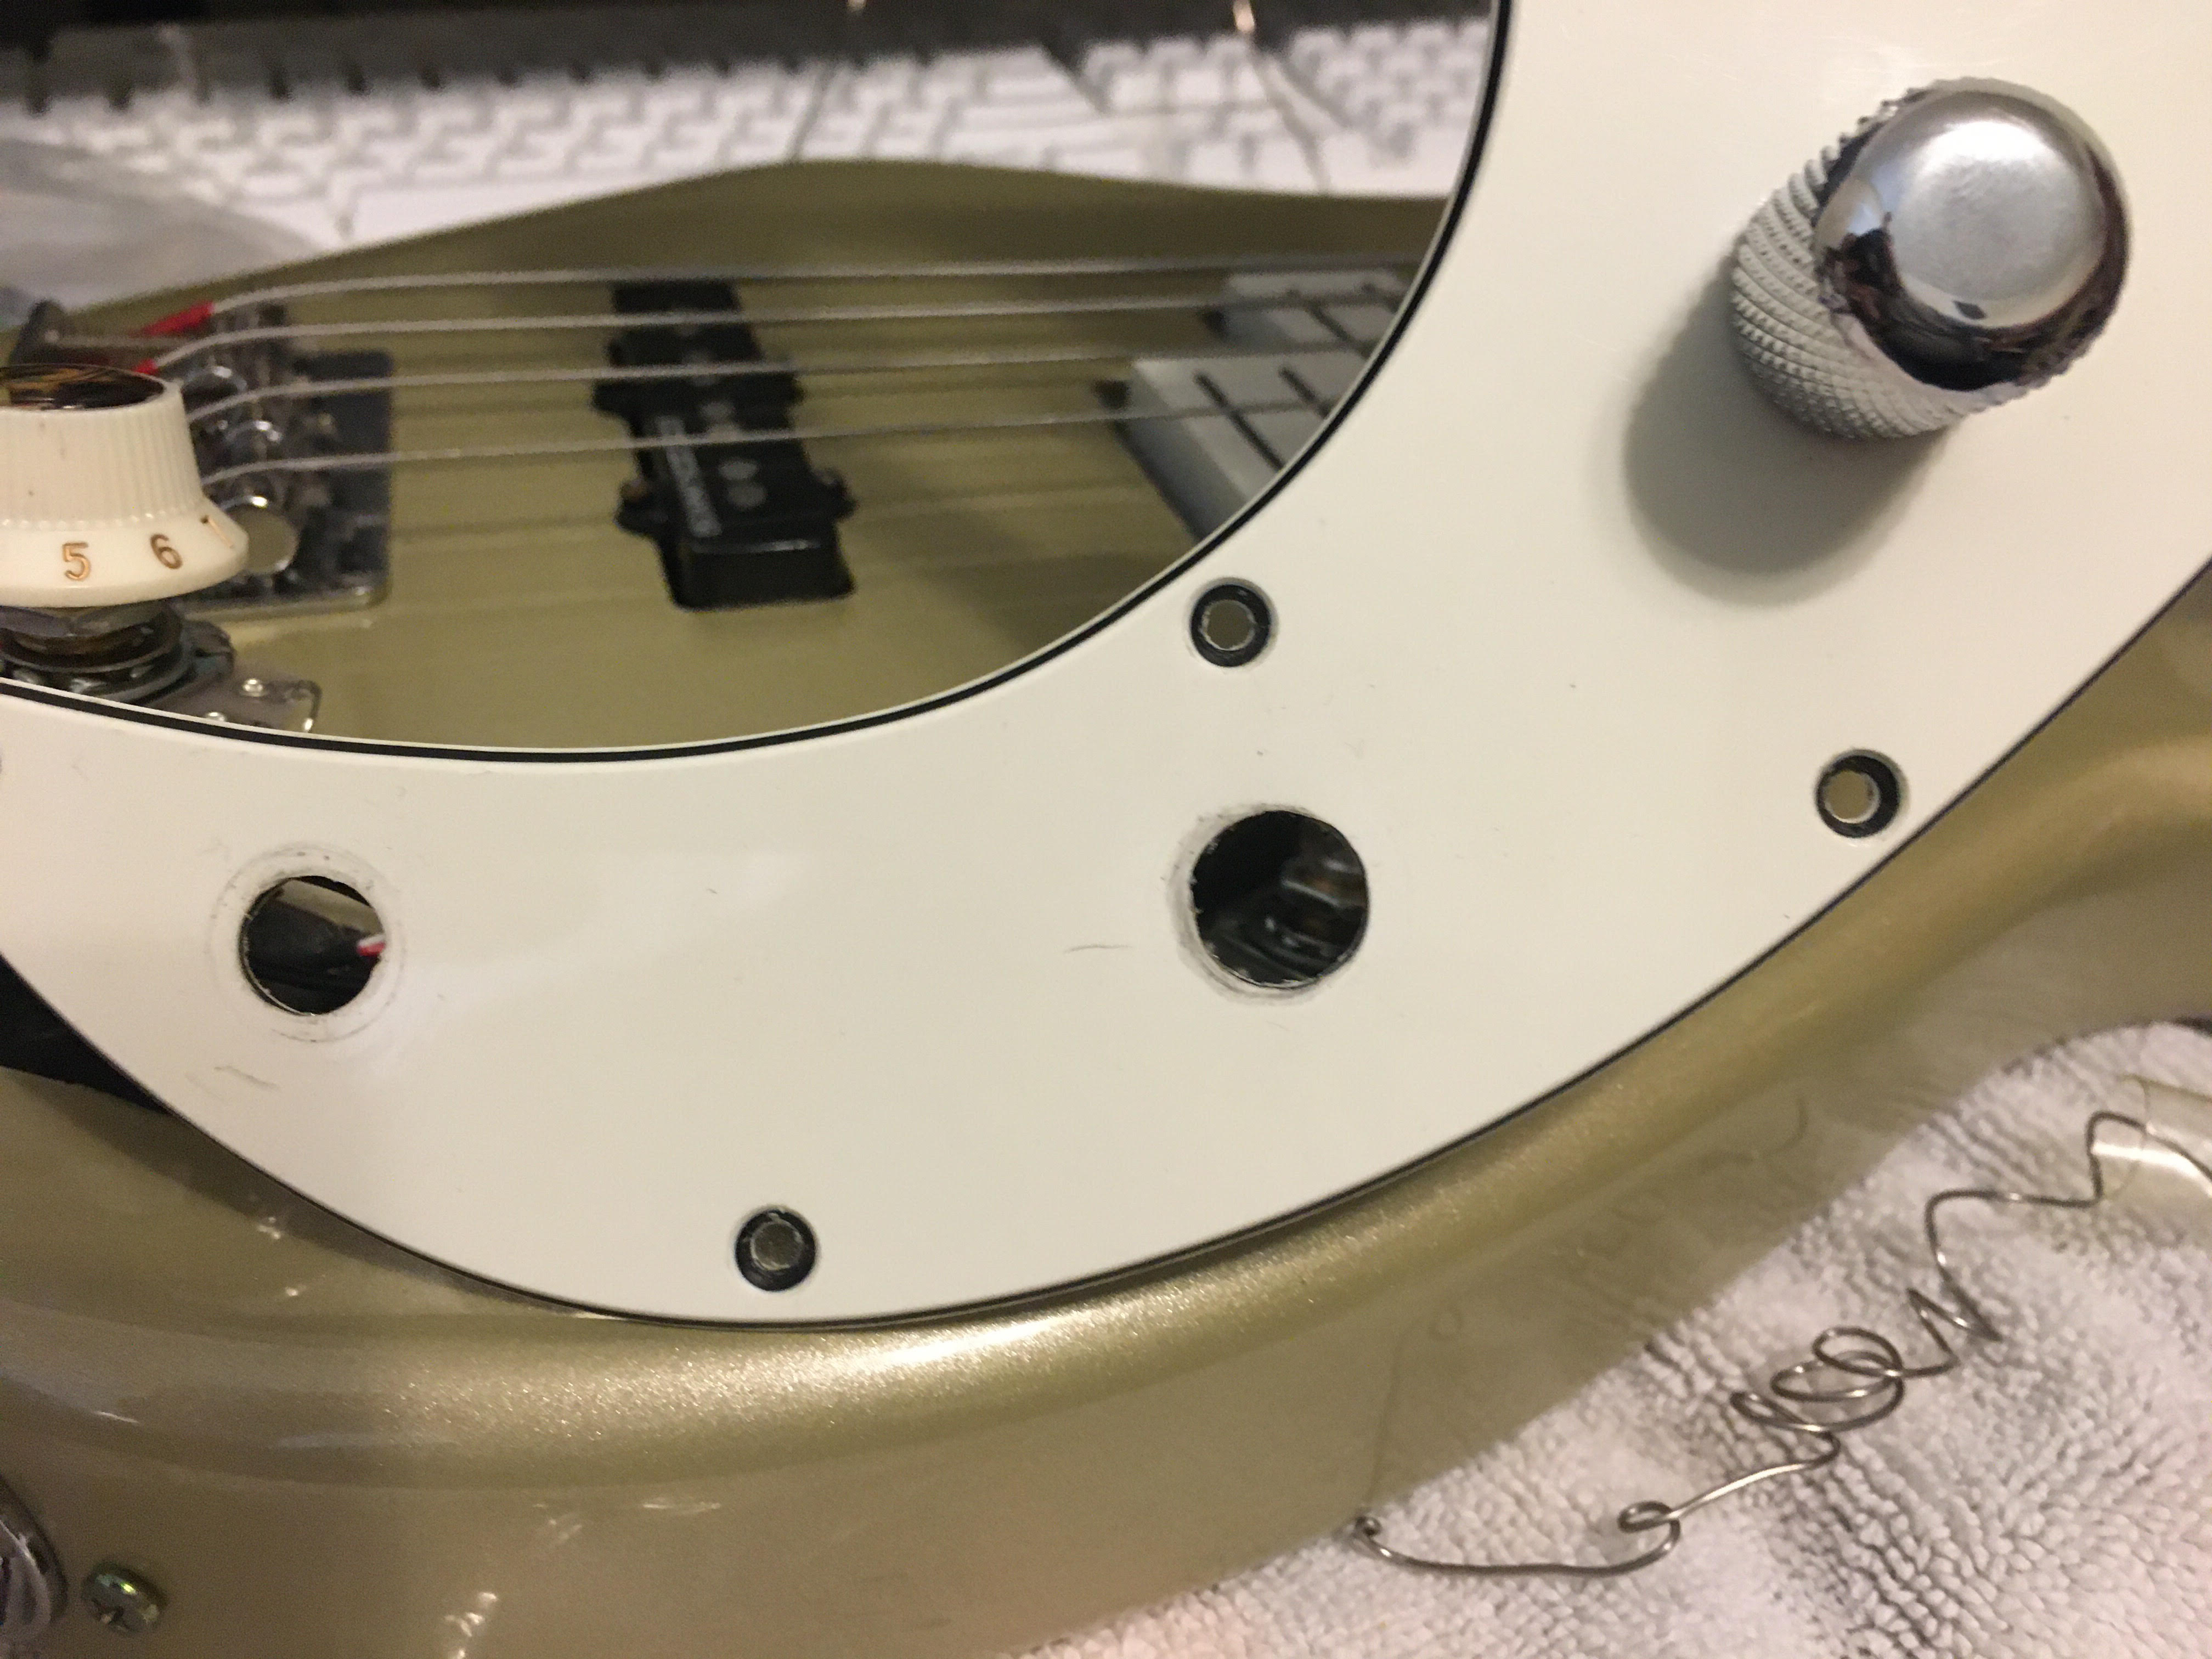
 Any ideas what difference this makes in the tone?
 One of the p-bass pickups is clearly marked “Neck,” but the diagram shows the neck pickup with a white wire and a black wire. The pickup that’s labeled neck has two black wires, and the other one has the white and black wires. So, something is reversed (the drawing or pickup label). Do these ohm out differently? I’m going to try to contact Seymour Duncan, and see if I can find a clue!