Ran out of time so slapped it back together with the original pots and wiring since I want to take it on my travels for work this week. I’ll have to finish the electronics upgrades next weekend and the washers under the round knobs will have to be painted black… but it’s almost done…

3 Likes
Yeah, I was taking apart a pickup this weekend, and discovered that they were spring tensioned to be able to move them up or down, when the springs popped out and the tiny screws got scattered. But what to do if the pickup cavity is too big/ too small for what you want, or non-existent? I guess it would involve a router, or some kind of filler, or, well, I like your solution!
Is there a tool list of “must haves” for a project like this? Or a link? I’d imagine a sander, drill, screwdriver heads of all types, and maybe a solder gun, and probably a few other goodies. But, like @PeteP I probably need a few months of solid learning/practice/playing under my belt before taking something like this on !!
4 Likes
The must haves for this project were screw drivers, hex wrenches, a socket set with deep sockets, soldering iron, sand paper and a sanding block. I also used a band saw and tabletop belt sander to shape the blocks used for filling the cavities but that could have been done by hand or skipped altogether, just filling the holes with many layers of bondo. Another handy tool is a large magnet… for sweeping across the floor to find those tiny screws that are constantly trying to escape. 
5 Likes
Instead of removing the bridge, would it work to go at it with a sharpie? They have fine tips that could probably fit in the small holes. Just trying to think how you can save yourself some work. Not that I have any idea whether it would effectively cover up on that surface. I look forward to seeing the close ups when it’s all finished.
I’m also looking forward to hearing about how the pickups turn out.
3 Likes
I did go ahead and remove the bridge about 10 minutes after I posted that, the red showing through was making me consider drilling holes and making it string-thru… which would have probably been a real mess as I don’t have a drill press and getting the exit holes to land evenly spaced in a nice neat line would have been next to impossible with a hand drill. So yeah, 2 strings to loosen, 4 screws to remove the bridge, black Copic marker, reinstall bridge… 5 minutes of work to prevent disaster.
The pickups sound good, no volume discrepancy between strings. But the bridge is quieter than the neck (which is normal since the strings vibrate less at the bridge and more at the neck) and I’ll remedy that next weekend by making a shim for the bridge pickup to bring it 1/8" closer to the strings.
3 Likes
I love all this… but my favorite part is the knobs.
Nice choices.
4 Likes
Thanks @Gio. If you’re looking for custom knobs check out JAT Custom Guitar Parts on Reverb. Yes, they are a little pricey but Justin does amazing work and considering they are custom parts and not mass produced, they can really make your instruments stand out.
4 Likes
Finally had time to do some mental hurdle jumping and finished this rat’s nest of wires. 
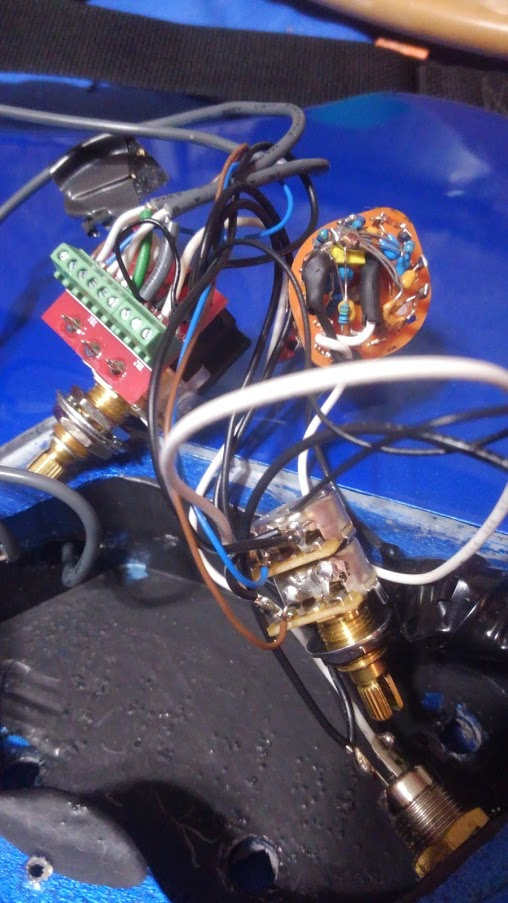
Now I need to figure out a way to record a sound sample… my phone is horrible for recording the low frequencies of bass.
6 Likes
I would refer you to this…
But something tells me you’re going to build your own audio interface…
5 Likes