Fuck Cancer
3 Likes
something to be aware of is the dried color of the glue line with titebond; if you are using a lighter wood (ash, maple), use TB original, warm wood (oak, beech) use TB 2, and a darker wood (cherry, walnut) use TB3. all 3 have different properties (mostly in terms of water resistance/waterproofing) but for an instrument i dont think it matters much, more so the color of the glueline. while subtle it is noticeable.
5 Likes
thanks for the info. I’m putting a top on it all anyway and will stain the back a darker color 
Speaking of, I’m relaxing after the trips to Harbor Freight and Home Depot (mentally exhausting…) and then I plan to haul everything out to the driveway and attempt this w/ out removing digits.
3 Likes

3 Likes
One thing I have often wondered about multipiece guitar bodies, and especially neck-thrus, is how strong the body glue joint actually is. If it were metal and welded there is no question but unlike a weld, glue joints are often not stronger than the surrounding material.
So I have wondered if something like drilling and adding lateral dowels in the body plane would be a good idea.
Would obviously need to do this pre-gluing though; no one likely has a drill bit long and strong enough otherwise
1 Like
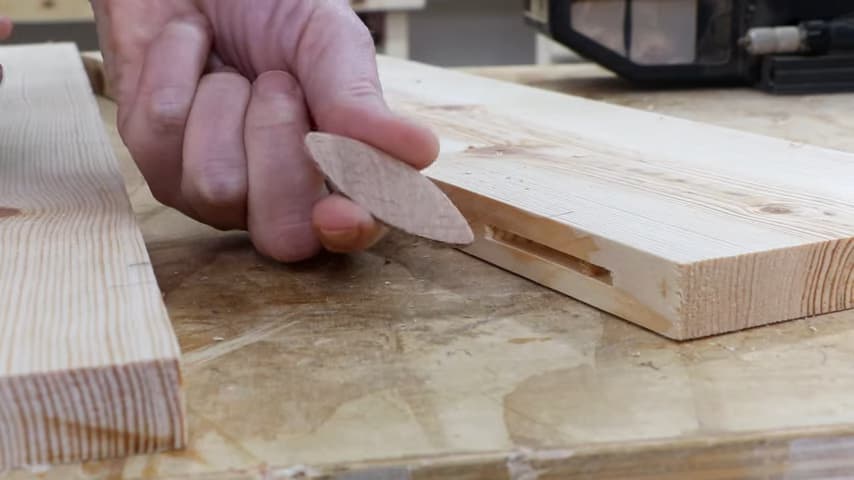
You’d normally use a biscuit jointer for this kind of work. The jointer cuts the slots, then glue in the biscuits and glue the face of the joint. The biscuits expand slightly (swell because of the water content in the glue) and it’s pretty tough.
The precise slot also helps line up the surface of the pieces you’re joining together.
This is standard practice for joinery.
If you don’t do it this way and just glue it, it’ll probably fail.

5 Likes
That makes sense, thanks!
2 Likes
if you are gluing long grain to long grain (like @Koldunya does in the above pic) than the glue joint is much stronger than the wood itself - i have tried this myself and the wood always breaks before the glue joint; plus there is a ton of data supporting this.
there is really no reason whatsoever to add dowels, dominos, biscuits, or anything else from a strength perspective. but like @Barney mentioned it is a good idea to use dowels, dominos, or biscuits for alignment: keeping the faces of the boards coplanar with either other during the glue-up. after the glue has cured none of those things adds any strength to the joint at all - the long grain glue joint is far stronger than any of those.
you can also easily use cauls (straight pieces of wood that are waxed to stop glue from sticking to them) perpendicular to the grain to keep everything coplanar; you sandwich the boards between pairs of cauls at each end and clamp down to keep everything lined up.
5 Likes
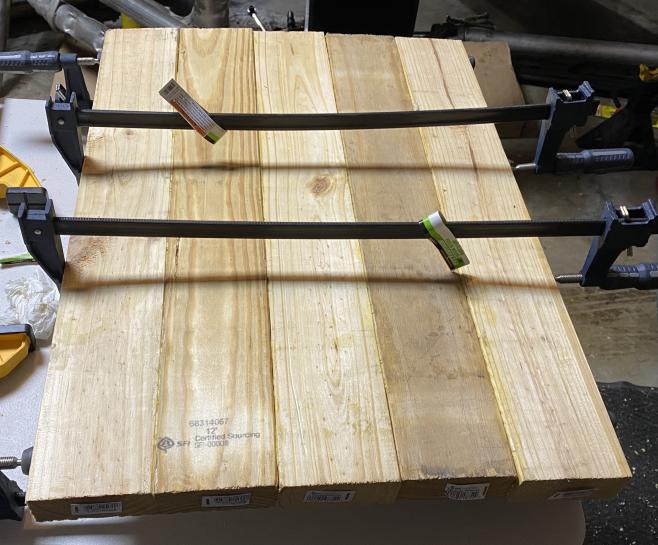
just a heads up - clamping pressure comes out at about a 45 degrees from each side of the clamp (90 degrees total) - which means that in this glue-up the ends of your boards are not getting good pressure and i would be worried about them coming apart after you have finished the piece. please check out my horribly bad illustration below. if all of that stuff that is not getting pressure ends up getting cut out of the final piece than nothing to worry about.
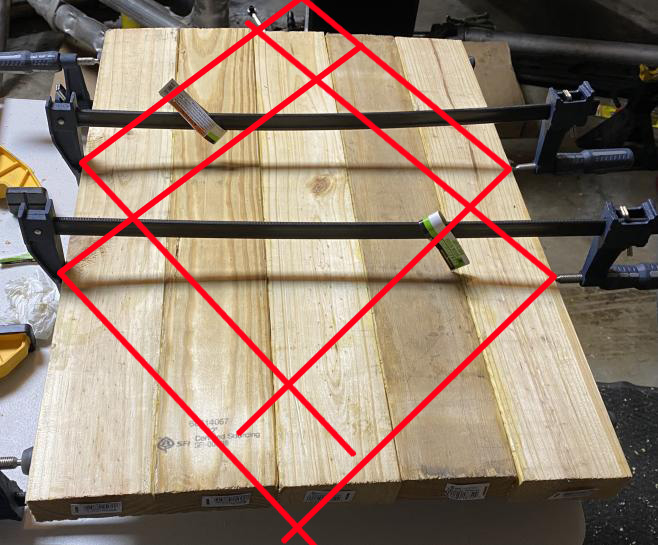
7 Likes
Very good points from @mgoldst here. The real reason someone like me uses biscuits is consistency. I do this for a living, it isn’t a hobby where I have endless time to tinker. I’ve got a bunch of work backed up so I don’t have the time to redo things.
Biscuits, dominoes, dowels etc are really good for one thing and that’s, as was explained earlier, keeping it all planing through.
When I case out door trim I always use biscuits on the 45deg mitres. Why? because it keeps both pieces of trim in the same plane. So when I come to sand the joint later for the painters it’s faster.
Carpentry isn’t hard, it’s just a collection of hundreds of little time saving tricks you pick up over the years.
I quoted a guy to install 10 interior doors and case them out in VG fir. He asked me why it was so expensive. We then listed all the tools he didn’t have to complete the job and 20+ years of me doing this very thing. Everything seems easier from the outside looking in. Humans are quite poor at understanding this
5 Likes
And this is why people have been ruining homes since Home Depot opened their doors. The things I see! ….you must see it all.
5 Likes
![]() Yeah, my favourite was a guy who bought a duplex and decided to make his crawl space bigger. It was about 2’ tall under the main floor. So (by hand) he dug down 8 feet. To make a full sized basement. Brilliant, right? Unfortunately for him this meant he dug 6 feet below the bottom of the house foundations. The weight of the house pressed down on the now not fully supported foundation and both his and neighbouring part of the house started to slowly subside. The best part was that he was an engineer.
Yeah, my favourite was a guy who bought a duplex and decided to make his crawl space bigger. It was about 2’ tall under the main floor. So (by hand) he dug down 8 feet. To make a full sized basement. Brilliant, right? Unfortunately for him this meant he dug 6 feet below the bottom of the house foundations. The weight of the house pressed down on the now not fully supported foundation and both his and neighbouring part of the house started to slowly subside. The best part was that he was an engineer.
A little knowledge, is a dangerous thing.
5 Likes
This! definitely this as #1.
however, if you don’t have a biscuit joiner, a poor man’s substitute are a drill and dowel pegs. An alternative would be to route a tongue and groove on the boards, or perhaps overlaps, but that loses about 1/2" of width off each board in a set up like @Koldunya 's
1 Like

I know a lot of very stupid engineers.
4 Likes
Every job is easier if you have the right tool… provided you know how to use the tool. Elsewise, it’s a goatf**k. I’m just completing the renovations in my house readying it for sale. I’ve been here 4 years, and bought it as a fixer-upper. It took me all this time to reverse all the redneck engineering. I haven’t spent a fortune in terms of money, but the time investment was insane. Fortunately I had most of the tools, and some background in framing, drywalling, and window installation, plus concrete and welding from my farming days. Nowhere near your experience, TBS, but I can’t imagine learning all this crap on the fly.
3 Likes
Thanks. It’s not as apparent, but there are two more clamps at the ends for a total of four. I decided to flip it over for the middle clamps because I was seeing a very slight bowing and didn’t want to make it worse.
I’m also gluing fence boards on top of it like this:
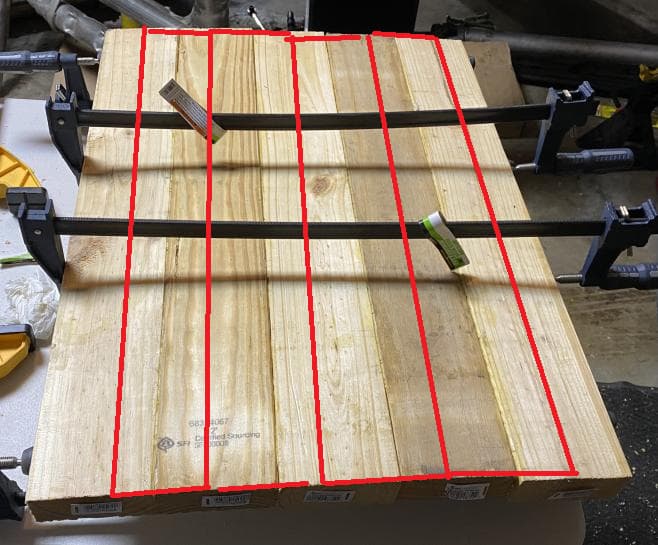
After that, I’ll pour some “bar top” epoxy on it to fill/seal the weathered boards and give it a level/uniform surface before I do any routing for neck pocket/pickups/controls/etc
It seems to me with all that, I should end up with a pretty solid body blank to work with.
Should XD
4 Likes
Plan on doing any sword fighting? That would be a very good shield, although a tad heavy ![]()
2 Likes
Please please please epoxy in the bar code in the middle at the tail of the bass, would (wood?) be so cool. ![]()
1 Like
You mean the pieces of paper with barcodes on the ends of the boards? Or the stamp on the second board from the left? (which will be covered when I place the fence boards on it)
2 Likes