So, I built a pedal!

Found these neat kits from AionFX.com (#NotSpon) and figured a Tube Screamer clone would be a good start to learn on.

Kit came with everything needed to build it, although I noted you can buy the PCB only and source all the other parts yourself. I might do that with the build after next.

It’s more of a guitar pedal but I definitely tested it on the bass!

Build Time was probably about 6 hours. One capacitor in the kit was the wrong value. Consequently, I’ve learned that the original passive high pass filter intends to cut at 723 Hz but my current circuit is cutting at 1591 Hz. So more highs are getting through than intended.

I also had a couple beginner mistakes which increased the overall build time. I totally derped and put the LED in backwards at first and my de-soldering techniques need much improvement so the PCB did get a damaged trace near the LED… Nothing I could not remedy with a little jumper wire.

I’ll have to pull this apart again once I get the correct value capacitor delivered but they made it pretty easy to do that.

I think I might grab their Dark Glass Bass Drive
Microtubes kit next, anybody have any opinions on that pedal? (The original one)

Here’s a couple pictures:

10 Likes

Sweet! A few others here have made pedals, @terb especially. Cool ideas. One place you might want to check out is MusikDing in Germany.

All Darkglass pedals are stellar. The clone kits out there are usually based on the B3K, which is an outstanding drive/distortion. You can also find kits of the Vintage Microtubes.

2 Likes

That’s good to hear! I went back and checked their page, and they are basing it on the B3K.

“The Maelstrom Bass Drive is based on the Darkglass® Microtubes® B3K, a CMOS-based drive circuit, with some additional tweaks adapted from the Vintage Microtubes.”

It’s currently sold out as a full kit, so I’ll prob wait on it unless I get the itch to source the parts myself. I guess that means I could customize the stomp box as well if I decide to do so.

I’ll have a look at that site you posted as well. Thanks!

2 Likes

Congrats, that’s a nice build !

Yeah I agree with that. a TS is a true classic, not the simplest but still easy enough for a beginner.

That’s not something I would recommend, actually. If you source the components by yourself, it will take a lot of time and probably cost as much or more money than the full kit. And there is no benefit really, except if you want some very special components.

That’s how you learn :slight_smile:

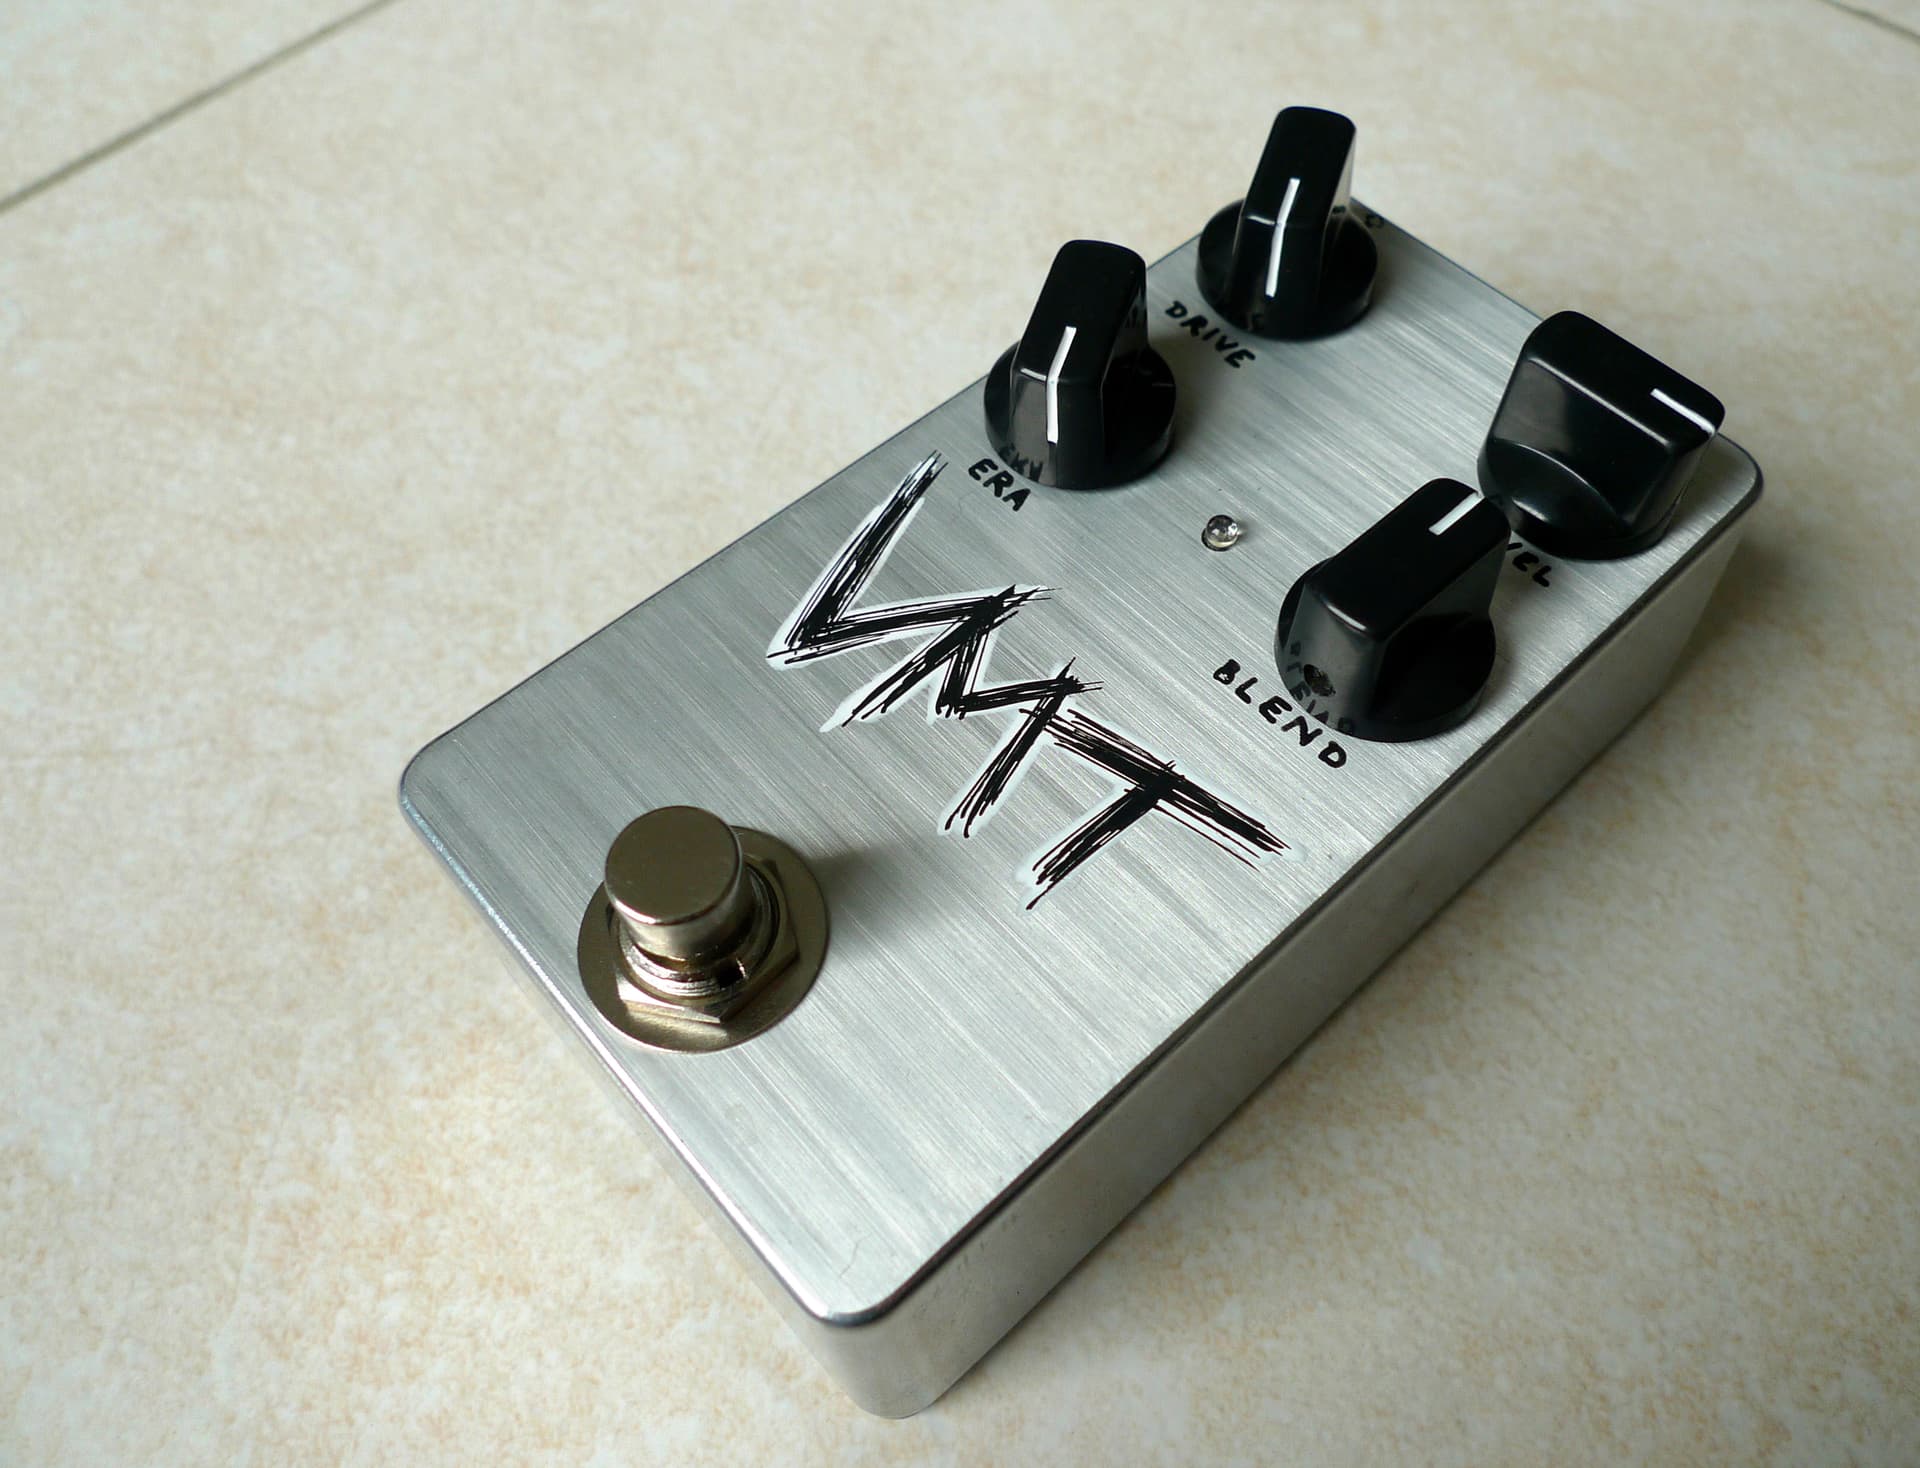
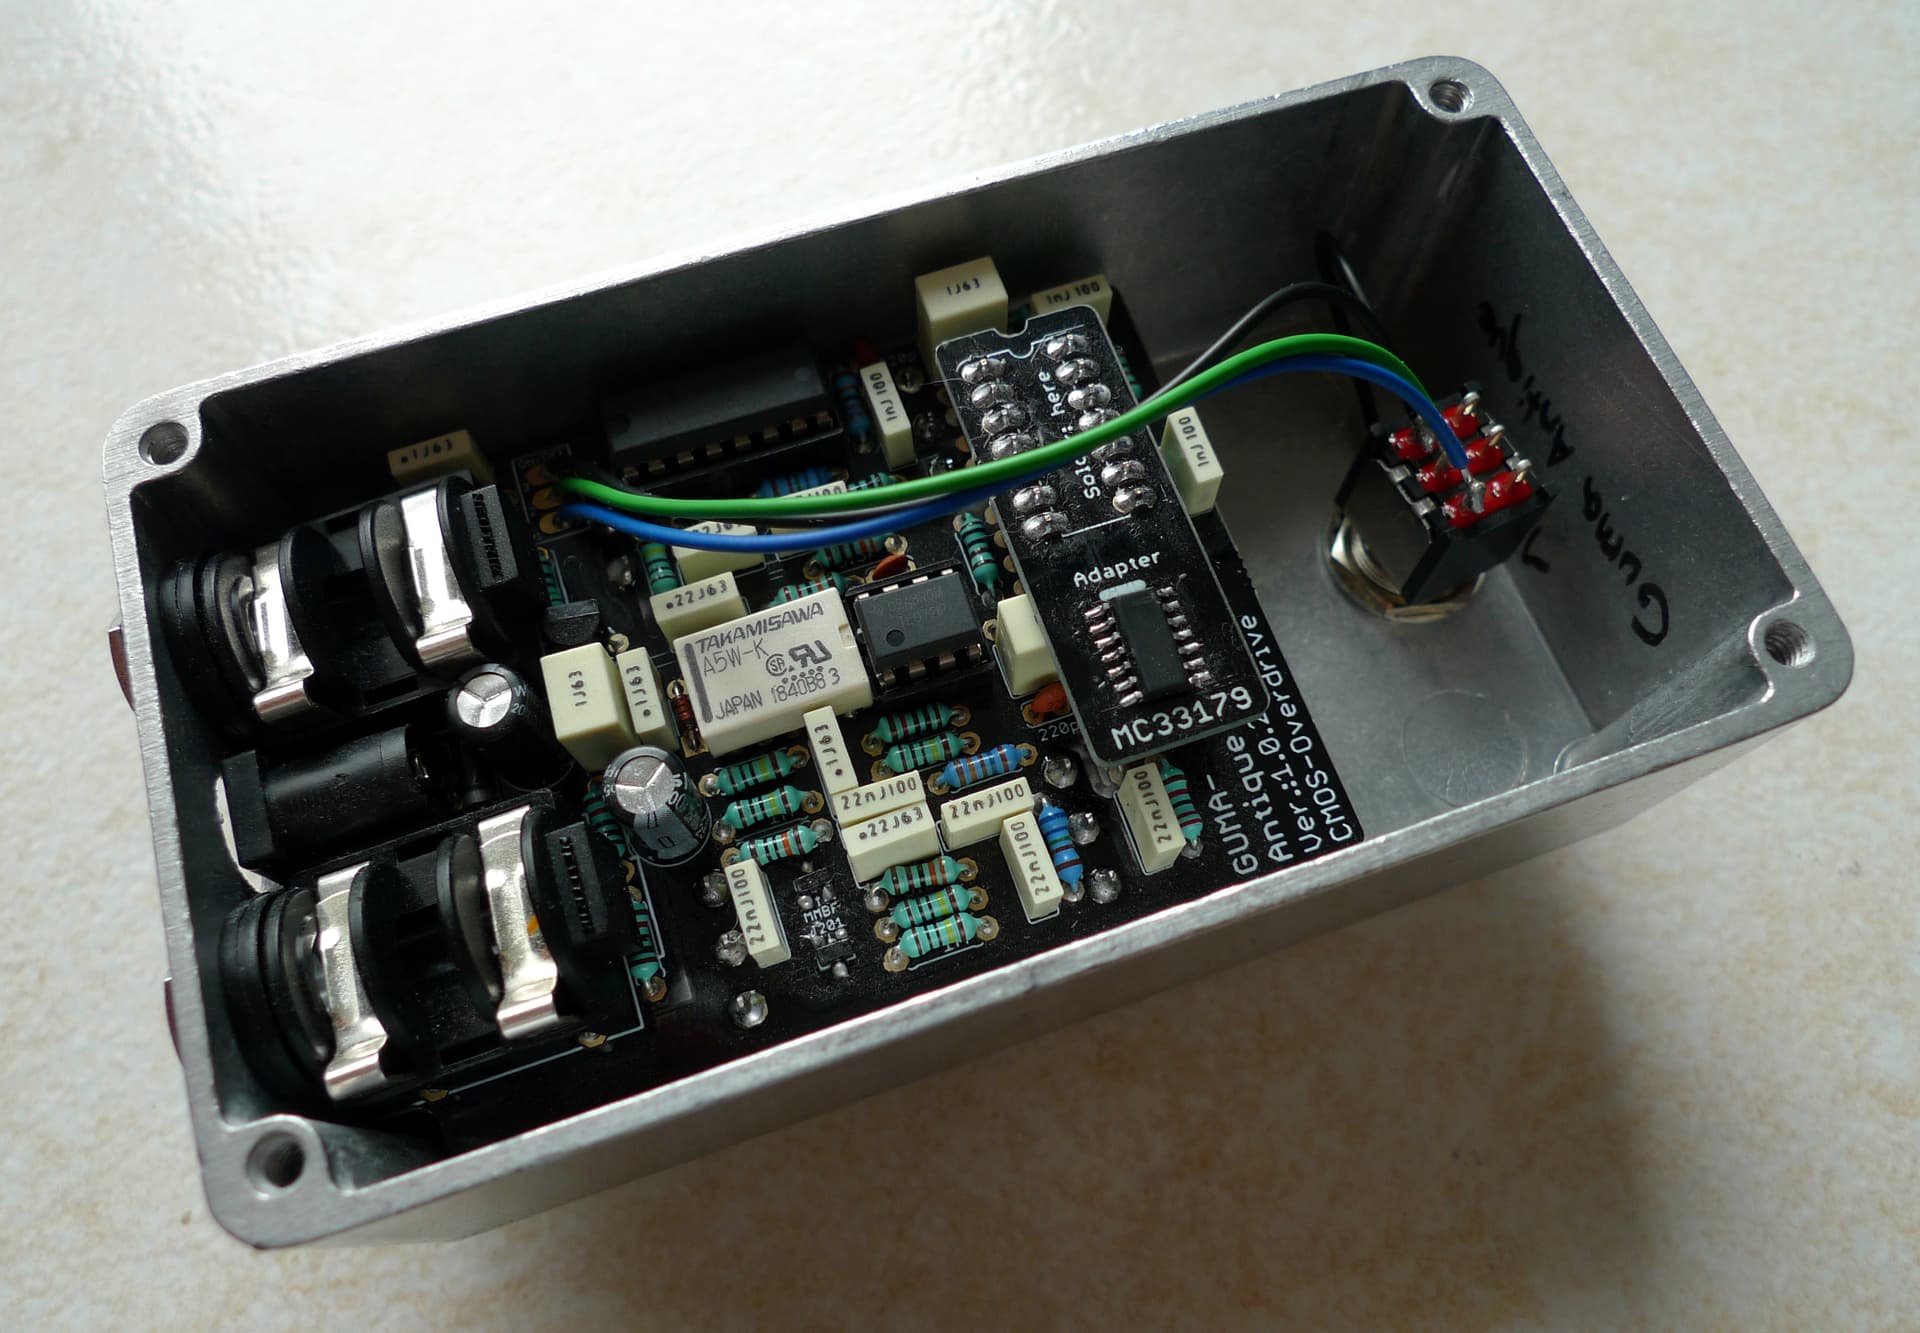
I have built a Vintage Microtubes kit, it sounds quite good. I used it on this cover. I must say that it’s way more difficult than a Tube Screamer, because there are a few SMD components.

4 Likes

Thanks @terb !

I had considered the extra cost and effort required if I went the PCB only route and I definitely agree with you. I think the only benefit is being able to customize the outer box to your own design. That requires drilling, sanding, painting and such though. I love the idea of making the design but not sure I’m up for all that challenge yet.

I really love the pedal you posted. The font and lettering under the knobs is really cool. How many SMD components did you have to deal with? I’ve done a little SMD practice before; it was all on broken equipment so I didn’t really have to worry about messing anything up.

2 Likes

Great timing of this thread, I wanted to post one on DYI pedals just few days ago!
Well done!! Also for fixing the unevitable mistakes of a first build. The end result looks very very nice, the enclosure fully ready to go is a huge time saver I guess (and looks pretty badass too, so double yay). How does it sound on bass?

I am in the (very slow) process of putting together my first pedal as well, I also bought a kit, this one.
PCB components are soldered, I’m now finishing the enclosure, I’ve put the decal on just few minutes ago. So far I would say that the whole process of preparing the enclosure (designing, printing, sanding, priming, painting etc) is way more time consuming that the actual soldering.

Noob question: how do you guys solder the pots? Do you first fix them on the enclosure and then solder them on the PCB “in the enclosure”, or you solder them on the PCB first and then mount the whole thing in the enclusure? (Apologies for the poor wording, I hope that’s clear. )
I guess in both ways one hopes that everything lines up properly :sweat_smile:

Regarding the Maelstrom, that’s my next project, I already have the kit flying around and will start thinking about it as soon as I finish the fuzz. It’s basically a B3K with the Era knob from the Vintage Microtubes. If you dig into the instructions you see the list of parts and the substitutions you need to do if you want to build it as a Vintage Microtubes clone instead of a B3K clone. For the moment I don’t plan to change anything and will build as a B3K clone, but it could be a fun thing to try out at a later stage. These AionFx kits seem very well put together.

@terb I love the look of that brushed aluminium! Did you do it by sanding? I considered it as an option for my 1st project, I should have probably gone that route :sweat_smile:

2 Likes

Thanks @LucaM !

I was pretty happy with the sound on the bass, I should have gotten a recording… (getting my recording setup done correctly is a whole 'nother matter. :sweat_smile: )

I’m glad you mention the process of preparing an enclosure. It seems like it’s even more effort than I’ve already contemplated. Not scared off, just not sure if I’m ready at this time.

As for the pots, they were mounted to the enclosure along with the switches and stomp switch. Then the board was laid in and soldered. I will say getting the alignment right took some fidgeting with before I could start soldering.

If not for the one capacitor being the wrong value, I would give Aion an A+ rating. I guess I’ll say it’s a strong A rating after my first build experience.

Their instructions are very clear and the fact that they give you spreadsheets of parts is super helpful. When I started looking at the Maelstrom kit, I was able to upload the spreadsheet of parts to Mouser and they filled out the cart automatically for me. Then a quick trip over to StompBoxParts for pots and a few other doodads and I would have everything to get started.

That’s amazing!

1 Like

It depends on what is easier, it can be different from one pedal to another. Do what’s more practical for you !

Yes ! it has been the first time I do this. I used two wood planks to guide the sanding in a very linear way, it ended up pretty well.

3 Likes

Oh I feel you, one at the time :sweat_smile:

For the enclosure, it really depends on how much you care and what level of personalization you want. For me the appeal of a pedal is also in its visual so I tried to put some efforts into that, which definitely increased the overall time spend on the build. I’ve already learned that next time I won’t solder a single thing until the enclosure is completely done. I will definitely consider the brushed alluminium finish next time, looks absolutely flawless @terb!

I didn’t know you could upload the spreadsheet and fill the cart automatically, that’s pretty nice! Definitely looks less scary than sourcing the components one by one. But I’m a lazy fuck on that and the convenience of kits is just too tempting as of now :joy:

Thank you and @terb for the tips on soldering the pots! Will see what works for me and will let you know. I hope I can finish the whole thing this weekend, pictures will follow :slight_smile:

3 Likes

Soooo, Mastodon fuzz finished!


It was a bit of a mess sorting out the offboard wiring, I had to follow a different schematic as the 3PDT provided in the kit was not the same as indicated in the Mastodon instruction, it definitely made it much more confusing for a noob like me. Also because of this at first I forgot the resistor for the LED, so it was not working. A quick googling followed by soldering the resistor on the 3PDT fixed it.
I wouldn’t reccommend this kit for a beginner, too many grey areas and even the instructions of the Mastodon are somewhat lacking. The AION kit instructions seem like a whole new level.

For the pots, I loosely fixed them on the enclosure, fitted the PCB and then soldered, worked quite well for me.

The pedal works and sounds pretty cool but I can only get usable tones if I lower the volume on my bass by a lot. If I go in full volume I get some very nasty overtones/clanky noises, almost like clipping, not sure why. I have a passive PJ bass if that matters.
One component in the kit was wrong, R7 was 11k instead of 10k as per schematics, would this have any impact? Any other suggestion on how to handle this?

Overall I’m quite happy how it turned out and for sure I learned a lot of things, which I hope will be useful in the future (e.g.: jack wiring). It was the first time I soldered so I hope the next pedals will be a bit smoother.

4 Likes

@terb or @howard could probably answer your questions the best.

2 Likes

@terb can verify but to me that change could potentially make a difference but probably won’t.

My take would be roughly:

R7 being different that R6 would change the bias across the EQ pot, probably favoring one side. If they were dramatically different it could be weird.

However, that 10% is likely close to the tolerance of the resistors anyway, or not far outside of it. So, it might not matter. And even if noticable it might lend bias in a way you like anyway :slight_smile:

Also, meta-comment: that is a very simple circuit and seems really approachable for beginners (or for that matter, people like me that are way out of practice.) I really like it!

3 Likes

Yes @howard is right about this R7 value. It can change a little bit the EQ setting when the pot is in its middle position but that’s negligible.

Not sure about this, as it is the purpose of a fuzz to bring some nasty clipping. If you want to be sure you can measure the voltages indicated on page 3 of the PDF for troobleshooting.

5 Likes

Those instructions are really well done. This is a nice kit.

3 Likes

Awesome build @LucaM !

I’ve already ordered another kit from AionFX, this time it’s gonna be the Dark Glass Micro Tubes bass drive. I also decided to order a PCB only for their Luna Tremolo kit as I plan to drill my own enclosure for that one. Their drill template looks pretty solid so I’m excited to give that a go.

…it’s not made of pizza.

…until you figure out how to make one with pizza - right? :wink:

(h/t to @MikeC - riffing on a joke he made)

1 Like

Ya know…pepperoni just isn’t as electrically conductive as I’d like. The search continues… :upside_down_face:

3 Likes

Natural semiconductor! Perfect for a nice spicy analog fuzz.

2 Likes

enough salt that it should be!

2 Likes

Thank you @howard and @terb for your feedback! I will not bother then in replacing that resistor.
Regarding the clipping sounds, I quickly recorded an example:

I’m not at all an expert of fuzz/distortions but to me sounds like it’s oversaturated? I also noticed that the Wool knob doesn’t change anything, and from what I read that pot is supposed to change the amount of fuzz.
So maybe there’s something weird going on in that part of the circuit. After the holidays I’ll get a multimeter (another lesson learned!) and check some values. I’ll also re-check for cold solder joints.

Thank you @cheeze_pizza! Nice, I also have the Darkglass clone kit as a next project! This time I’ll prepare the enclosures of couple of pedals at ones to save some time and then I’ll get into the soldering. I agree that their drill templates are trust-inspiring!

2 Likes