Maybe some chrome polish?
5 Likes
Mhhh. Not sure how viable this is but I remembered chemistry lessons and electrolysis for removing rust.
But you’d have to remove the whole pickup to do a setup for that solution and also I don’t know if it affects magnets in any way. Maybe the chemist @joergkutter can be of assistance and tell me why my idea doesn’t work 
3 Likes
@gcancella fret rubbers/erasers are what’s best. @juli0r @howard
Jamie
5 Likes
Oh nice. Any kind of brand you can recommend?
4 Likes
They come in a set of three different grits. Will also give you a chance to polish your frets before restringing, I’ve bought fromnAmazon & eBay
Jamie
3 Likes
Haha, see where my big mouth got me… Erm, performing electrolysis on an alloy we don’t even exactly know the composition of is tricky, and you need a whole bunch of equipment… way too much hassle. I would stay away from any wet chemical approach (acids etc,) for any number of reasons as well…
What @Jamietashi suggest sounds both most promising and probably absolutely sufficient!
Maybe also get some tips from @AdrianaM, who did a similar job recently!
By the way, and AFAIK, the rust on the pickups doesn’t interfere with their function ![]()
5 Likes
Yes. Mention something once in a thread that I’m reading and I will bring it up again ![]()
Like that the first bass peterhuppertz owned was a Hondo.
I hope my wording made it clear before your response that I had the idea but with very much doubt how viable it would be in any case.
Yeah. A youtube search on “electrolysis” and “magnets” brought me to various experiments which examined the influence of a magnetic field on electrolysis and
a) the magnetic field influences the process
b) made clear what you said
Fret rubbers.
Jup. Gotta get those should any rust emerge.
Let us know how it goes @gcancella
4 Likes
I have that idea also, but it’s comparable to going on an extreme makeover and then forgetting about cleaning your teeth… after you ate some chocolate brownie
5 Likes
And here I am rusting parts on purpose for that vintage look. 
6 Likes
Maybe on my next project 
5 Likes
I’m so lucky.
Here I thought I would have less money this month and then some bookkeeping fuckery happens and I get a little more than usual. I won’t get into the details but it isn’t an error - I talked to my superior and it’s correct.
So this will soon arrive at my doorstep:
Not only did I get more money than I expected. The build kit is also in stock by now instead of available in 1-2 weeks!
What a good day to be alive.
cough back to work.
9 Likes
I’m pretty curious about those kits. Please try to document the process step-by-step 
3 Likes
I planned to do that anyway but since someone asked for it now I will make sure to document it. There was already someone who built 2 kits but only showed the result here in the forum: Kit Bass Builds
Still if you have any questions there’s someone who finished 2 kits. Probably not exactly mine but so far I haven’t heard of a lot of quality differences between those build kits.
From what I’ve read in reviews of the product is that it comes with clear step-by-step instructions. Even if so I will document that part too.
Also most of the reviewers were positively suprised at the quality overall. I will be too if the result is a playable bass that sounds ok.
4 Likes
They’re very simple to put together although they can be time consuming if you really want a nice finish on the body.
The manual that came with mine said “ Sand, sand and then sand again. And once you think you’ve done enough, sand again”!!!
2 Likes
Oh…
That’s something I haven’t asked before: What kind of tools do I need? I assume different grains of sandpaper would be a good idea? I think I would like to get the tools before the package arrives so I can begin as soon as it does.
I already have a sabre saw, screwdrivers of course, hammers (including a rubber one) and well what one usually already has for home improvement. Not sure about the name “sabre saw”. I looked up a translation and it translated to a lot of different saws including jigsaw. I’m talking about an electrical saw in which the blade goes up and down.
1 Like
Hi @juli0r,
If I were you I’d leave the Sabre saw in the shed unless you want to some serious body mods,
You just need good sand paper starting with course working up to 1200 grit or even finer to give better finish, and resend after every coat of paint you put on.
Cheers Brian
3 Likes
@juli0r
When you put the clear coat on and sand between coats, you should be able to polish to a really nice finish.
As @Mac has said sand and sand.
3 Likes
The headstock is not cut out. I wanted to leave the body as it is but the headstock needs some more form than it arrives in.
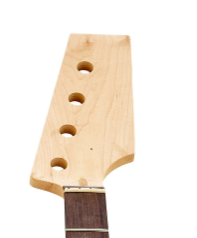
Most if not all of the people in the reviews adjusted the headstock. Sometimes with a hand saw so I don’t think that’s a part I want to leave out.
Maybe I’m missing the english vocabulary or the woodworking vocabulary in general. Resend? Oh… resand. Yeah, that makes more sense xD And here I thought…
3 Likes
Hi @juli0r,
Depends how you want the headstock to look, using a router could give you some nice contours?
Cheers Brian
3 Likes
That’s the thing - I do own the saw, I do not own a router and in my mind cutting a rough shape with the saw and then sanding it down seems okay to me.
While I would also buy additional tools if needed. So far I just don’t see the reason for the other option.
2 Likes